
Starting your seeds indoors can be a game changer for your garden. It allows you to take control of your growing environment and gives your plants a head start. With the right tools, like the Ferry Morse seed starting grow light, you can create the perfect conditions for your seedlings to thrive. Let's explore how to maximize your garden's potential with effective seed starting techniques.
Key Takeaways
- Using the Ferry Morse seed starting grow light can help your seedlings get the light they need.
- Maintaining the right temperature and humidity is crucial for seedling success.
- Choosing quality seed starting mix improves germination rates and plant health.
- Thinning out seedlings is important for stronger, healthier plants.
- Hardening off your seedlings before transplanting helps them adjust to outdoor conditions.
Creating the Perfect Environment for Seedlings
Light and Temperature for Optimal Growth
Okay, so you're ready to get those seeds going! One of the biggest things to think about is light and temperature. It's like setting the mood for a good party – you want it just right for your little plant guests. If you don't have a super sunny spot, don't sweat it; grow lights are your friend.
- Aim for around 70-75°F (21-24°C) during the day. A little cooler at night is fine.
- If you're using a heat mat, keep an eye on the soil temperature. You don't want to cook your seeds!
- Rotate your seedlings every few days. This helps them get even light and prevents them from stretching too much.
Think of your seedlings like little sunbathers. They need their light, but they don't want to get burned. Keep an eye on them, and adjust as needed.
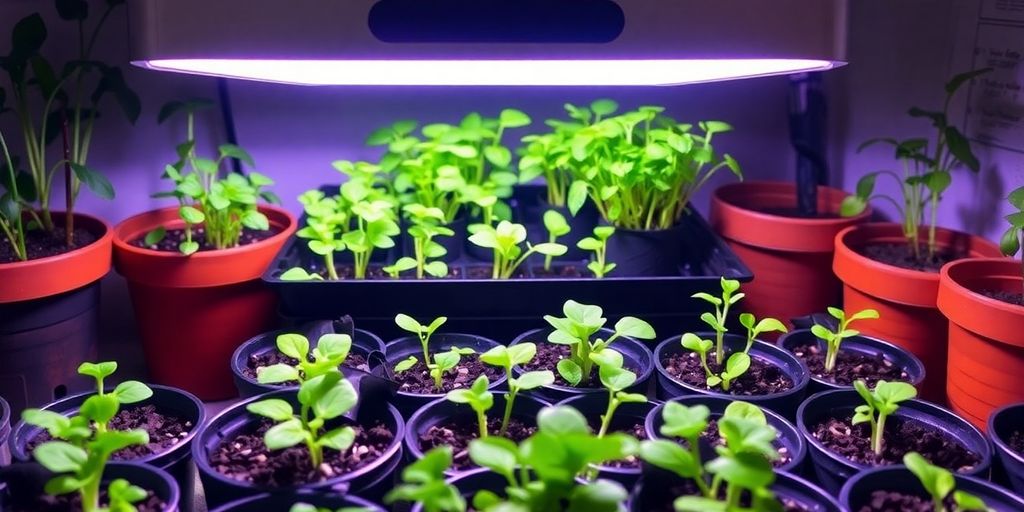
Using Grow Lights Effectively
Grow lights can be a total game-changer, especially if you're dealing with limited sunlight. But you gotta use them right! It's not just about sticking a light bulb over your plants and hoping for the best. Proper placement is key.
- Hang your grow lights a few inches above your seedlings. As they grow, you'll need to raise the lights to keep that distance.
- LED grow lights are super energy-efficient and don't get too hot, which is a plus.
- Set a timer for your lights. Aim for around 14-16 hours of light per day. Your plants need their beauty sleep too!
Maintaining Humidity Levels
Humidity is another piece of the puzzle. Seedlings like a bit of moisture in the air, but not too much. Think of it like Goldilocks – not too wet, not too dry, but just right.
- Use a humidity dome or plastic wrap to cover your seed trays. This helps trap moisture and keeps things humid.
- Mist your seedlings regularly with a spray bottle. This gives them a little boost of humidity without overwatering the soil.
- If you notice condensation building up on the dome or plastic wrap, crack it open a bit to let some air in. You don't want things to get too soggy.
Essential Tools for Seed Starting Success
Starting seeds indoors can feel like a big undertaking, but with the right tools, it's totally manageable! It's all about setting yourself up for success, and that starts with gathering the essentials. Let's break down what you'll need to get those little seeds sprouting.
Choosing the Right Containers
Okay, so containers might seem simple, but they're actually pretty important. You've got a few options here. Seed trays are great for starting a bunch of seeds at once – think of them as apartment complexes for your future plants. Peat pots are another cool choice because you can plant the whole pot right into the ground later on, which minimizes transplant shock. And hey, don't underestimate the power of recycling! You can totally gather essential supplies like yogurt cups or egg cartons, just make sure to poke some drainage holes in the bottom.
Selecting Quality Seed Starting Mix
The seed starting mix is where the magic happens. It's not the same as regular potting soil – it's lighter and fluffier, which is exactly what those delicate little roots need. You want something that drains well but still holds enough moisture. Look for mixes that contain peat moss, vermiculite, and perlite. These ingredients help with aeration and drainage, preventing your seedlings from getting waterlogged. Trust me, a good mix makes a huge difference!
Investing in Grow Lights
Light is food for plants, and sometimes, your windows just don't cut it, especially during those gloomy winter months. That's where grow lights come in. They mimic sunlight and give your seedlings the energy they need to grow strong and healthy. You don't have to break the bank – even a simple fluorescent shop light can do the trick. Just make sure to keep the lights a few inches above your seedlings and adjust them as they grow. A Ferry Morse Grow Light can be a game changer.
Having the right tools really does set you up for success. It's like having the right ingredients for a recipe – you can't bake a cake without flour, right? So, invest in these essentials, and you'll be well on your way to a thriving garden!
Setting Up Your Indoor Seed Starting Station
Alright, let's transform a corner of your home into a seed-starting haven! It's easier than you think, and super rewarding when you see those first sprouts pop up. Think of it as setting up a cozy little nursery for your future garden.
Organizing Your Space
First things first, find a good spot. Ideally, you want a place that's easy to access and doesn't mind getting a little messy. A spare room, a corner of the basement, or even a sturdy table in your living room can work. The key is to protect your floors and surfaces – trust me, spills happen! I like to use a plastic drop cloth or an old shower curtain liner to catch any stray soil or water. Make sure you have enough room to move around and tend to your seedlings comfortably. Consider how close it is to a water source; lugging watering cans across the house gets old fast.
Arranging Grow Lights
Now, let's talk about light. Seedlings need a lot of it, and unless you have a south-facing window that gets direct sunlight all day, you'll probably need to supplement with grow lights. Adequate lighting is essential for healthy growth. Here's the lowdown:
- Type of Lights: Fluorescent shop lights or LED grow lights are great options. They're energy-efficient and provide the full spectrum of light that plants need.
- Placement: Position the lights a few inches above the seedlings. As the plants grow, you'll need to raise the lights to maintain that distance. This prevents the seedlings from getting leggy.
- Timers: Use a timer to automate the light cycle. Seedlings typically need 14-16 hours of light per day. A timer ensures they get consistent light, even when you're not around.
Setting up your grow lights properly is one of the most important steps. It's like giving your seedlings a daily dose of sunshine, even on cloudy days. Don't skimp on this step!
Utilizing Heat Mats for Germination
Heat mats can be a game-changer, especially for seeds that prefer warmer soil temperatures, like peppers and tomatoes. They provide gentle, consistent heat that speeds up germination. Here's how to use them effectively:
- Placement: Place the heat mat under your seed trays or containers.
- Temperature: Most heat mats maintain a consistent temperature around 70-75°F, which is ideal for most seeds.
- Monitoring: Keep an eye on the soil moisture. Heat mats can dry out the soil faster, so you may need to water more frequently.
Here's a quick table to help you visualize the ideal setup:
| Item | Purpose | Tips |
|---|---|---|
| Drop Cloth | Protect surfaces from spills | Use plastic or an old shower curtain liner. |
| Grow Lights | Provide supplemental light | Position a few inches above seedlings; use a timer. |
| Heat Mat | Warm soil for faster germination | Monitor soil moisture; water more frequently if needed. |
Maximizing Growth with the Right Techniques
Okay, so you've got your seedlings started, that's awesome! But the journey doesn't end there. Now it's time to really dial in your techniques to make sure those little guys grow into strong, healthy plants. It's all about giving them what they need, when they need it. Let's get into the nitty-gritty!
Watering Wisely
Watering seems simple, right? But it's easy to overdo it or underdo it. The key is to keep the soil consistently moist, but not soggy. Think of a wrung-out sponge. Overwatering can lead to root rot, which is a total bummer. Underwatering? Well, your seedlings will just dry up and die. A spray bottle is your best friend for gentle watering, especially when they're tiny. As they grow, you can switch to a small watering can, but always be gentle! Also, make sure the water is at room temperature – cold water can shock the roots. I usually let my water sit out overnight before using it.
Thinning Seedlings for Stronger Growth
Okay, this one can be tough, but trust me, it's necessary. Sometimes you'll get multiple seedlings sprouting in one cell or pot. It's tempting to let them all grow, but they'll end up competing for nutrients and space. You need to thin them out, which means snipping off the weaker ones at the soil line. Choose the strongest, healthiest-looking seedling and say goodbye to the rest. I know, it feels a bit brutal, but it's for the greater good! This gives the remaining seedling the space and resources it needs to thrive. Think of it as tough love.
Hardening Off Your Plants
This is a crucial step before transplanting your seedlings outdoors. Imagine going from a cozy indoor environment to the harsh realities of the outside world – sun, wind, temperature fluctuations. It's a shock to the system! Hardening off is the process of gradually acclimating your seedlings to outdoor conditions. Start by placing them outside for just an hour or two in a sheltered spot, then gradually increase the time each day over the course of a week or two. This allows them to toughen up and adjust to the elements. Don't skip this step, or you risk losing your precious seedlings! You can use full-spectrum LED grow lights to help with this process.
Hardening off is like sending your kids off to college. You can't just drop them off and expect them to thrive. You need to prepare them for the real world, bit by bit. It's a process, but it's worth it in the end.
Here's a simple schedule you can follow:
| Day | Time Outdoors | Conditions |
|---|---|---|
| 1-3 | 1-2 hours | Shady, sheltered spot |
| 4-6 | 3-4 hours | Partial sun, protected from wind |
| 7-9 | 5-6 hours | Mostly sunny, some wind exposure |
| 10-14 | Full day | Full sun, normal outdoor conditions |
Remember to bring them back inside if there's a frost warning or extreme weather. Good luck, and happy gardening!
Exploring Unique Seed Varieties for Indoor Gardening
Heirloom vs. Hybrid Seeds
Okay, so you're ready to branch out and try some different stuff, huh? That's awesome! When it comes to seeds, you'll often see the terms "heirloom" and "hybrid." What's the deal? Well, heirloom seeds are basically the OG seeds. They've been passed down for generations, and they're known for their unique flavors and characteristics. Hybrid seeds, on the other hand, are created by cross-pollinating two different varieties to get specific traits, like disease resistance or bigger yields. They are bred for specific traits, like disease resistance, but they won't produce true-to-type seeds if you save them. Heirlooms are old-time varieties, often with unique flavors and colors, and they will breed true. Open-pollinated seeds are naturally pollinated and also breed true, making them great for seed saving. It's all about what you're looking for in your indoor garden. If you are looking for a vegetable seed variety pack, you can find a wide variety of options online.
Finding Rare Seeds Online
The internet has made it super easy to find all sorts of cool and unusual seeds. I mean, seriously, you can find seeds for purple carrots, striped tomatoes, and even miniature watermelons! Here's the thing: not all online seed sellers are created equal. Do your research! Look for reputable companies with good reviews. Check out online gardening forums and see what other gardeners recommend. Also, be wary of super cheap seeds – they might not be the real deal.
Here are some things to consider when buying seeds online:
- Read reviews: See what other gardeners have to say about the seller.
- Check for guarantees: Does the seller offer a germination guarantee?
- Look for detailed descriptions: The more information, the better.
Starting seeds indoors gives you access to a wider range of plant varieties than you’d find at a nursery. It’s like opening up a whole new world of gardening possibilities.
Growing Uncommon Herbs and Vegetables
Why stick to the same old basil and lettuce when you can grow something totally different? Indoor gardening is the perfect way to experiment with uncommon herbs and vegetables. Think about growing things like:
- Lemon Balm: A fragrant herb that's great for teas.
- Shiso: A Japanese herb with a unique flavor.
- Kohlrabi: A weird-looking but delicious vegetable that tastes like a cross between a turnip and a cabbage.
These are just a few ideas to get you started. The possibilities are endless! Don't be afraid to try something new and see what happens. You might just discover your new favorite herb or vegetable. Plus, you’ll have strong, established seedlings ready to go once the outdoor conditions are perfect. Starting seeds indoors means you're not waiting around for the weather to cooperate. Some plants, like tomatoes and peppers, take forever to mature. By starting them inside, you’re giving them a head start while the ground outside is still frozen or too wet to work with.
Troubleshooting Common Seed Starting Issues
Okay, so things aren't always sunshine and roses in the seed-starting world. Sometimes, you run into snags. But don't sweat it! Every gardener faces challenges. The important thing is to learn how to spot and fix them. Let's tackle some common problems together.
Dealing with Leggy Seedlings
Leggy seedlings are basically seedlings that are stretching waaaay too much for light. They look tall, spindly, and weak. The main culprit is usually not enough light. Here's what you can do:
- Increase Light: Move your seedlings closer to your grow lights or a brighter window. If you're using grow lights, make sure they're only a few inches above the plants.
- Provide Support: Gently stake the seedlings with small sticks or toothpicks to help them stand upright.
- Replant Deeper: When you transplant, bury the stems deeper in the soil. The buried part of the stem will grow roots, making the plant stronger.
Preventing Mold and Disease
Ugh, mold and disease. Nobody wants that! Damp conditions and poor air circulation are usually to blame. Here's how to keep your seedlings healthy:
- Improve Air Circulation: Use a small fan to gently circulate air around your seedlings. This helps dry out the soil surface and prevents mold from growing.
- Water Carefully: Avoid overwatering. Let the top of the soil dry out slightly between waterings. Water in the morning so the leaves have time to dry during the day.
- Use Sterile Soil: Always use a sterile seed-starting mix. Garden soil can contain pathogens that can harm your seedlings.
Prevention is key! A little extra care can go a long way in keeping your seedlings healthy and strong.
Adjusting Light and Temperature
Getting the light and temperature just right can be tricky, but it's super important. Seedlings need consistent conditions to thrive.
- Monitor Temperature: Use a thermometer to keep an eye on the temperature around your seedlings. Most seeds like it around 70-75°F (21-24°C).
- Adjust Light Duration: Seedlings generally need 12-16 hours of light per day. Use a timer to make sure they get enough light, even if you're not around.
- Observe Your Plants: Watch your seedlings closely. If they look pale or stretched, they probably need more light. If they look wilted or scorched, they might be getting too much light or heat.
Enjoying the Benefits of Indoor Seed Starting
Starting seeds indoors? It's more than just a hobby; it's a game-changer for your garden and your wallet! You get to nurture those tiny sprouts into strong seedlings, ready to burst into life the moment the weather plays nice. Plus, there's something incredibly satisfying about watching seeds sprout right before your eyes, knowing you're giving them the best possible start.
Saving Money on Plants
Let's be real, those trips to the garden center can add up fast. Buying established plants is convenient, sure, but it's also way more expensive than starting from seed. A single seed packet costs a fraction of what you'd pay for a mature plant, and it can give you dozens, even hundreds, of potential plants. Think of all the extra veggies, herbs, or flowers you can grow without breaking the bank! It's like getting a whole garden for the price of a few lattes.
Getting a Head Start on the Growing Season
Living in a place with unpredictable weather? Indoor seed starting is your secret weapon. You don't have to wait for the last frost to get your garden going. By starting seeds indoors, you're essentially fast-forwarding the growing season. Those tomatoes and peppers that need a long, warm summer to thrive? They'll be well on their way before the ground outside is even workable. It's like having a time machine for your garden!
Starting seeds indoors gives you a significant advantage. You're not at the mercy of the weather, and you can ensure your plants are strong and healthy before they face the challenges of the outdoor world.
Accessing a Wider Variety of Plants
Tired of seeing the same old plants at your local nursery? Starting from seed opens up a whole new world of possibilities. You can find rare heirloom varieties, unique colors, and plants that aren't typically available in your area. Want to grow purple carrots or striped tomatoes? With indoor seed starting, the choice is yours. It's like having a custom garden designed exactly to your tastes.
Wrapping It Up
So there you have it! With the Ferry Morse Seed Starting Grow Light, you can really boost your gardening game. It’s all about giving your plants the right start, and this light helps you do just that. Remember, starting seeds indoors isn’t just practical; it’s a fun way to get your hands dirty and watch life sprout right in your home. Whether you’re growing herbs, veggies, or flowers, you’re setting yourself up for a garden that’s not just good, but great. So grab those seeds, set up your grow light, and get ready to enjoy the fruits of your labor. Happy gardening!
Frequently Asked Questions
What is a grow light and why do I need one?
A grow light is a special light that helps plants grow indoors. If you don’t have enough sunlight, a grow light can provide the right amount of light for your seedlings.
How warm should my seedlings be?
Seedlings grow best in temperatures around 70°F. It’s important to keep them warm but not too hot.
What kind of containers should I use for starting seeds?
You can use seed trays, peat pots, or even recycled containers like yogurt cups, as long as they have drainage holes.
How much light do my seedlings need?
Seedlings need about 12-14 hours of light each day. Using a timer can help you manage this easily.
What should I do if my seedlings are growing too tall and leggy?
If seedlings are leggy, it usually means they aren’t getting enough light. Move the grow lights closer to them.
Why is hardening off important?
Hardening off helps your seedlings adjust to outdoor conditions before planting them in the garden. This way, they won’t be shocked by the change.